Written by JOE LAMP’L and published on https://www.growingagreenerworld.com/
Pruning is a fun garden task but it can be daunting to get started with. For some people it is the gardening version of public speaking – terrifying! Fear the secateurs no more, my friends. We are breaking down pruning to the basics so that you have the skills to prune like a pro.
The secret to fearless pruning; 5 steps to prune like a pro
Pruning Primer: From Newbie to Ninja
Every gardener has heard that pruning is important. But getting out in the garden and actually doing it is a frightening challenge to many. After all, you’ve worked and waited so long to get those trees and shrubs to grow; now you’re going to lop off some of that hard-earned plant growth?!?

It may seem counterintuitive, but the fact is this:
One of the very best ways to stimulate a plant to grow is to cut it back. Sometimes WAY back.
Pruning controls a plant’s size and shape. It removes dead or diseased branches or limbs. It improves overall structure and health by allowing more light and air into the center of the plant. But, yes, strategically cutting a plant also encourages new growth or flowering. It’s addition by subtraction… and while that may not make much sense from a mathematical perspective, the science behind it will make you a believer once you see the amazing results.
Inside a plant’s terminal buds and growing tips, a hormone called auxin is stored. Auxin’s job is to suppress the growth of other lateral buds below. Think of it as a traffic cop, holding back a line of cars. Only when the traffic cop is gone can those cars that have been waiting on stand-by race onto the freeway.
Remove a plant’s growing tip by pruning and you also remove the auxin. The nearby plant buds are no longer suppressed and will grow rapidly in response to the auxin’s sudden absence. If leaf buds are present on both sides of the branch, you’ll likely get two or more new branches for each one that’s cut.
But make no mistake: pruning isn’t an endeavor to be taken lightly or attempted haphazardly. Once a limb is severed from the plant, there’s no going back. And making that first cut can be intimidating- downright terrifying- even to veteran gardeners. So here are five steps to help you overcome your fear of pruning, taking you from a newbie who’s afraid of the blade to a ninja who wields the steel with utmost precision and skill.
1. Choose your moment wisely.
There’s a time for everything, and some seasons of the year are better for pruning than others. If you’re simply trying to remove dead or diseased branches, go for it whenever the mood strikes. Otherwise, factor in the following considerations.

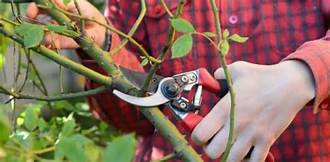
Anvil style pruners like these cut and crush. They’re best used for clean up of dead limbs and branches.
Late winter/early spring– just prior to new growth starting to develop-is generally the best time to prune. Although pruning does stimulate new growth, this doesn’t apply during dormancy. Most plants and trees utilize stored energy from fall and winter to produce new growth just below the pruning cut when conditions are favorable in spring, once the temperatures and day length signal the appropriate time.
The exception is for trees known for heavy sap flow, like walnut, maple, birch, and chestnut. With these varieties, excessive sap can bleed out of a pruning wound and result in potential stem dieback. Wait to prune these trees in summer, when the leaves will draw sap past the cut, reducing the chances of excess moisture at the wound.
Early/mid-summer– after full leaf expansion- is an acceptable time to prune. Be aware, though, that much of a plant’s stored energy is already gone, used to produce new spring growth. Cut this new growth off now, and it’s wasted. Yes, you will stimulate the plant to put out more new growth, but this extra demand can be stressful to the plant in the summer months, when conditions are likely to be dry and hot and the plant’s reserves are at a premium.
Early/mid-fall is the least favorable time to prune. Pruning now can encourage the plant to produce new growth just as it is sending nutrients and energy into reserves for the cold months to come. Re-routing those reserves can result in new growth that’s weak and more susceptible to damage or death by the colder temperatures. And that creates the perfect access point for over-wintering pests and diseases, especially for evergreens.
2. Know the rule of thumb for your flowering shrubs.
Certain shrubs bloom on new wood, producing flowers on the current season’s growth. Examples include abelia, clethra, and certain hydrangea varieties like Annabelle. These plants should be pruned in late winter; they will produce flowers the same year. For more on this as it pertains to butterflybush, check out my most-read post of all-time.
Other shrubs produce flowers on old growth, wood from the previous year. Azalea, rhododendron, holly, forsythia, and some hydrangea varieties like oakleaf, paniculata, and mophead are all in this category.* Pruning these in late winter would remove all the new flower buds that were formed after last year’s flowering. Shrubs blooming on old wood should be pruned immediately after flowering and before new buds are set.
*Yes, I know that some of you have pruned your mophead/French hydrangeas in spring and still had flowers that summer. It happens; it’s just not the norm.
3. Have the right equipment.
Whether a small handheld tool or long-handled loppers, your pruners will be one of two main cutting styles: bypass or anvil.

Bypass pruners (L) are best for cutting live plant material vs. Anvil style (R) which is best for cutting dead wood
Bypass pruners use a blade that passes by a non-blade part in a cutting action similar to scissors. This type of pruner is best for live plant material when a clean cut is essential and you don’t want to crush the remaining portion of the plant. Personally, I use my trusty Felco #2 bypass pruners (the ones on the left in the above picture) for almost all of my pruning tasks.
Anvil pruners use extra force to squeeze the branch or limb as a blade passes through the plant and stops against the other side of the tool. These are best for cutting dead limbs or when you’re not worried about crushing or damaging the remaining plant material.
4. Pick the place.
As in real estate, it’s all about location, location, location. If you cut too far away from the bud, that new growth you’re hoping for may never be stimulated. Cut too close to dormant leaf buds and they may be damaged to the point that they won’t recover and sprout at all.

To promote new growth, use bypass pruners to make a clean, angled cut about 1/4 to 1/2 inch above an outward facing bud.
For branches with a single bud below your cut point, select a spot on the branch about a quarter- to a half-inch above an outward-facing bud and make the cut at an angle with the high point facing outward.
For stems or branches with buds located in pairs (opposing one another on each side of the branch), make the cut straight across- with no angle- about a half-inch above the bud pair.
5. Know your limits.
How much is too much to prune? That question and a full explanation of your options is easily its own blog post for another day, a good guideline for live plant material is one-third. Measuring from the tip back, take no more than one-third of a total branch or total plant at any one time. True, some plants respond better than others to more severe pruning, your chances of overdoing it are greatly reduced if you stick to this one-third rule.
There is no need to fear pruning. Once you understand that in most cases, pruning is advantageous to the plant, then it’s simply a matter of getting started. The more you do it, the more confidence you’ll have about it. And before you know it, you’ll be pruning like a pro.
Original post here https://www.growingagreenerworld.com/how-to-prune-like-a-pro/.